My friend Erin gave me a group of AWESOME tee shirts, each with huge silk screened Dr. Seuss motiffs. They were destined to be onesies. This is the first, a pink shirt with the Cat in the Hat eating cake. The shirt is screen printed on both sides, the image on the back side showing through slightly on the right side.

I had to choose a part of the shirt to use as the focal point for the onesie. The cat in the hat is too good to pass up. Unfortunately the shirt front was too small to serve as both onesie front and back, so the back of the shirt (no image) is the back of my onesie.

Begin construction by disassembling the tee shirt. Carefully cut the sleeves away from the tee shirt body, then cut the shirt front from the shirt back.

Position your pattern piece over the image. Remember to compensate for seam allowances.

The sleeve piece for McCall's M8573 provides seam hem allowances. Because our sleeve is already hemmed, simply adjust the piece to compensate for the 5/8" allowance (see above).

I always keep my rotary cutter and mat handy while I'm sewing. It's a huge time saver. Cut out the four pieces (front, back and sleeves). Now here's where we get fancy. Use your rotary cutter to cut four "binding" pieces that will serve as a more attractive seam finish.
Cut accross the entire width of the tee shirt, making four 1.5" strips that will bind the neck edges (front and back) and lower edges.

Fold the strips in half and iron them. Pin the bindings to the right sides of the fronts and backs at neck edges and lower openings.

Insert strips of twill tape at the lower edges in the opening of the binding. This is the reinforcement for the snaps and will prevent the onesie from simply stretching, instead of opening, when you try to take it off the baby.

Serge the layers together. I have allowed for a narrow 3/8" seam allowance in my pattern.

Press seam allowances away from binding.

Finish the treatment with a straight stitch, stretching slightly as you stitch, and making sure to keep all the layers as flat as possible. From here, baste the front to the back, clip the curve of the body along the sleeve seam, pin the sleeves to the body. Serge the two using a 5/8" seam allowance. Your final seam is to stitch the side seams from sleeve hem to lower leg hem on both sides.
Now go get a hammer.
Seriously, go get a hammer and buy a snap kit! They are so cool! I'm loving them, and never could have guessed how easy they are. To think I opted to stitch snaps in the past. Oh well, hindsight is 20/20?

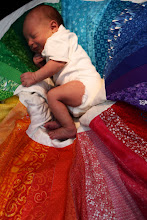
Well, Soren, the good news is that it's totally ADORABLE! The bad news is, I overcompensated for the last onesie being huge, and so this one is preemie sized. Maybe the next one will actually fit you? Does anyone know someone who needs a preemie sized pink Dr. Seuss onesie? I will GLADLY mail it to someone, as long as they send me a pic of a sweet girl wearing it? Seriously, if you want it, shoot me an email at sarah.l.hines at gmail dot com.


that is soooooooo cute!!!!
ReplyDeleteawww.....so cute!! :)) i've been looking for an online onesie pattern for ages - is this ur own or did u buy it? if its ur own, would u mind sharing it with me? :D *pwerty please??*
ReplyDeleteThanks for your comments! Mistymom, I'm more than glad to share my pattern, which in the end was the result of MANY revisions. It took five tries to nail it.
ReplyDeleteAs soon as I can get to scanner, I'll be sure to scan it and try to upload a PDF (which I've never done before. If it doesn't work out, I'll post and let you know I can't. I'd be glad to email it.)
Thanks for the feedback, and good luck onesie making!