Tuesday, January 27, 2009

This Sweet Moment

The sweetness of this moment...
Matched only by the promise of tomorrow.

Saturday, January 24, 2009

Happy First Monthday, Soren!


You are one month old today, baby!  Here are some things I love about you already.

I love the way you talk to me instead of crying in the wee hours of the morning when you're hungry.

I love your many dramatic expressions, crossing your eyes, lifting your eyebrows so your forehead wrinkles, or opening your eyes super wide in amazement.  I love the way you move your mouth, like you're licking a popsicle, or impersonating a frog.

I love the way you only want to cuddle all the time (but my sewing machine is jealous).  I love the way you'll cry until I pick you up and soak in contentment.  It hurts so much to leave you alone during naptime.

I love the way you stare into your daddy's face while he's holding you, and the way you have already learned not to cry when I change you or bathe you (until I take you out of the water, you're not so into the cold).

I especially love how strong you are already! You're lifting your head up and holding it steady.  Your little legs have a powerful kick and your little hands are like tiny vices.  When you hold my fingers and I pull up, you can support almost half of your body weight.

I love your tiny, long thin fingers and the way they are always moving, bending, reaching, grabbing and touching.  I love when you lock them together as if in prayer, and the way you thrust them into the air in your sleep.

Most of all, I love that I get to keep watching you grow and learn and share with you all the wonder of the world that God made for you to grow up in.

Happy first monthday, Soren!

Friday, January 23, 2009

Finally, a Onesie that fits perfectly!


Plant a new tree,
Treat it with Care,
Give it clean water and
Feed it fresh air.

This is made using McCall's 8574 as a starting point.  The pattern was HEAVILY modified... I will post my own pattern ASAP.  

I highly recommend, if you want to make a onesie, to start with a onesie that fits the way you want yours to.  The only parts of this pattern that I did not modify were the sleeves and sleeve curves on the front and back pieces.  I removed some of the width and length of the butt flap, removed some of the fabric at the neck opening, redrew the bottom curves to eliminate sharp edges and to create more coverage on the butt.  I also added "binding" at neck and leg edges.

Once again, this onesie was made from a Dr. Seuss tee shirt a friend gave me.  I find it ironic that the tee shirt about planting trees was recycled into a onesie (onset of guilt for going through so much paper in perfecting this silly pattern).

In the end, the pattern was worth the $2 I spent on it to get a sleeve pattern that actually worked.  Having made it work, I think I'll finish making Dr. Seuss onesies (three more to go!), and call it a day for a while.

I don't remember the last time I made something for me, not to mention the four yards of gorgeous grey suiting that is waiting to be made into circle skirts for Sarah M and her friend.  Did I mention I'm getting paid to sew a skirt?!  How epic is that?  I feel like a 5th grader who is getting paid to do what I love - pure glee.

Thursday, January 22, 2009

Dr. Seuss Onesie - Sewing with a Hammer

My friend Erin gave me a group of AWESOME tee shirts, each with huge silk screened Dr. Seuss motiffs.  They were destined to be onesies.  This is the first, a pink shirt with the Cat in the Hat eating cake.  The shirt is screen printed on both sides, the image on the back side showing through slightly on the right side.


I had to choose a part of the shirt to use as the focal point for the onesie.  The cat in the hat is too good to pass up.  Unfortunately the shirt front was too small to serve as both onesie front and back, so the back of the shirt (no image) is the back of my onesie.

Begin construction by disassembling the tee shirt.  Carefully cut the sleeves away from the tee shirt body, then cut the shirt front from the shirt back.


Position your pattern piece over the image.  Remember to compensate for seam allowances.


The sleeve piece for McCall's M8573 provides seam hem allowances.  Because our sleeve is already hemmed, simply adjust the piece to compensate for the 5/8" allowance (see above).


I always keep my rotary cutter and mat handy while I'm sewing.  It's a huge time saver.  Cut out the four pieces (front, back and sleeves).  Now here's where we get fancy.  Use your rotary cutter to cut four "binding" pieces that will serve as a more attractive seam finish.

Cut accross the entire width of the tee shirt, making four 1.5" strips that will bind the neck edges (front and back) and lower edges.


Fold the strips in half and iron them.  Pin the bindings to the right sides of the fronts and backs at neck edges and lower openings.


Insert strips of twill tape at the lower edges in the opening of the binding.  This is the reinforcement for the snaps and will prevent the onesie from simply stretching, instead of opening, when you try to take it off the baby.


Serge the layers together.  I have allowed for a narrow 3/8" seam allowance in my pattern.


Press seam allowances away from binding.


Finish the treatment with a straight stitch, stretching slightly as you stitch, and making sure to keep all the layers as flat as possible.  From here, baste the front to the back, clip the curve of the body along the sleeve seam, pin the sleeves to the body.  Serge the two using a 5/8" seam allowance.  Your final seam is to stitch the side seams from sleeve hem to lower leg hem on both sides.

Now go get a hammer.

Seriously, go get a hammer and buy a snap kit!  They are so cool!  I'm loving them, and never could have guessed how easy they are.  To think I opted to stitch snaps in the past.  Oh well, hindsight is 20/20?


Well, Soren, the good news is that it's totally ADORABLE!  The bad news is, I overcompensated for the last onesie being huge, and so this one is preemie sized.  Maybe the next one will actually fit you?  Does anyone know someone who needs a preemie sized pink Dr. Seuss onesie?  I will GLADLY mail it to someone, as long as they send me a pic of a sweet girl wearing it?  Seriously, if you want it, shoot me an email at sarah.l.hines at gmail dot com.  


Wednesday, January 21, 2009

End of the Wee Dresses Saga


In classic Sareece fashion, everything is done down to the wire.  If there is a minute after the last one in which I can complete something, I'll wait for that.

Little Meemz (A.K.A. Mimi to Soren and Peanut, who as of two days ago, we officially know to be Helen) is leaving to go see her new granddaughter tomorrow.  I repeat TOMORROW, so of course, I finished Helen's presents TODAY.

The dresses (as you may have read in previous posts) are my own design, each made from about a half a yard of fabric.  I purchased 1/2 yard of two knits to make McCall's layette shirts pattern 8574.  I had already made a onesie for Soren using the same pattern, and the second time around, made some alterations.
  1. On the neckline, the allowed hem is 5/8 inch.  I added bias tape at the neckline and sleeve hems.  My finished hem essentially extended to the edge of the pattern cutting line.  If you were to hem it another way, I would definitely alter the pattern to narrow the neck opening considerably.
  2. I lowered the curve of the front neckline so it was more of a scoop.  It was hard for me to tell the difference between front and back.  I also added a small tab of fabric to make the back obvious.
Helen's presents are with Mimi on their way to Pennsylvania.  She won't be able to wear them until she's bigger and already living in Ireland, but I'm pretty sure she liked them.  The red dress is HANDS DOWN the cutest, most fun little thing I've ever made.  The blue and red are going to Hannah and Helen... the green flowers are going to a friend who is long overdue for a thank you gift from my little family.

I promise, these will be the last pictures I will post of the wee dresses.

The cherry Red shirt with rose print tea dress is my favorite.  When I say favorite, I mean, I wish I could wear it myself.


Do the rose buttons make the dress, or the dress make the rose dress make the buttons?  


The button holes are made using a vintage Singer buttonholer attachment that I used in tandem with my 1942 Singer Featherweight.  It is a fabulous tool, and I love the work it does.  I'll upload a video tutorial very soon.  It wasn't easy to figure out how to use it without having any instructions, and the attachment isn't hard to find.  It's a fantastic tool and I highly recommend than anyone with a Featherweight obtain one.


I made the shirt binding using bias strips that were 2 1/2" inches wide.  Fold them in half, and stitch, right sides together using approximately 1/4" seam allowances (I serged mine together.  If you aren't serging, be sure to stretch slightly as you stitch so the neckline has some give).  Press seam allowances toward the neck opening, and fold over with enough to overlap.  I used a straight stitch "in the ditch" technique, stretching slightly, to complete the edge treatment.

Some dresses are treated with pleats, front and black, to create enough give in the skirt for a child's movement.  The blue dress below has gathers at the center front and back.

And how could you help but adore these buttons?  I had a bunch for a blouse I made pre-pregnancy, and had two left over.  Divine perfection!

Monday, January 19, 2009

Anecdotes from Soren's first month

Well, Soren Paul has had a very exciting first month of life!  He's met four of his Great Grandparents.  He's had an overnighter at Grandma and Grandpa Hines' house.  He was in a car accident, ate out at a restaurant (well, I ate).

I'm loving my little boy so much.

He is alarmingly strong, already holding his head up and still, gazing around at things and making eye contact with people.  His little eyes are still blue, and I'm hoping they stay that way.  His hair is coming in longer and thicker, and is still dark brown.  He's getting bigger and longer, filling out his newborn onesies longways, but they still hang off his skinny body on the sides.

He loves to stick his fingers behind his pacifier and fling it dramatically out of his mouth.  He gets pretty good distance with it, but then wants it back.  It's not a game yet, but will be in the not too distant future.  (He'll discover his Riger mommy always wins.)

His hands and arms are always outstretched.  I love it when he holds my finger with both hands at once.  Sometimes his tiny fingers interlock as if in prayer, and it makes my heart melt.

He sleeps at night very well, but is attached to people during the day and loves to be held and cuddled.  Not a big fan of being put down for naps.  Also not a big fan of being woken to have a diaper change.  Apparently the cold wipes are a little alarming after an afternoon catnap.

Bathtime?  Right now, we're not sure about it.  He dislikes being submerged in warm water, but dislikes being removed from the warm water even more.  Poor boy lives with polar bear parents who keep the house a little chilly!

Okay, to avoid rambling too much about my boy, I'll just put up some pics.  Soren can't wait for his cousin to be born any day now, too!


Wednesday, January 14, 2009

Circle Skirts!!!

Sarah Marie is my gorgeous, talented and elegant sister-in-law.  We cause infinite confusion by sharing the same name.  There was a time when we confused everyone we knew (until they figured out our middle names, or resorted to describing us by our physical characteristics).  That is, until we eliminated all variables but one.

"Sarah H?"
"Yes, the one with red hair."  (We both have red hair.)
"The home schooled one?"  (We were both home schooled.)
"Yes, the ballet dancer?" (Haha!  Aside from my weight gain recently and the fact that I can't imagine dancing right now, there was a time that I was almost as good as my graceful sister in law.)

That brief introduction aside, one other attribute that we share is an almost sickly passion for strange skirts.  The obsession with the circle skirt made from some charmingly unsightly fabric has consumed us for over two years.  It all started when I purchased at JoAnn's a fabulously unsightly print and fashioned from it with nothing but a spool of thread, a 1.5" wide length of grosgrain ribbon and an invisible Coats and Clark zipper, the very first ugly skirt.

We shop for things and find prints and say "isn't it fantastically ugly?!"  We buy each other ugly items, coveting the perfect ugly skirt.

This skirt falls short of being ugly, but I declare proudly that it fits Sarah Marie perfectly.  The fabric is a classic butter crepe in a simple black and white fabric.  Armed with my Singer featherweight and 4-thread Singer Overlock, I pulled this skirt together in under 2 hours.

A recipe for circle skirt success:
  • New Look 6149
  • 9" Coats and Clark Invisible Zipper - make sure you buy the custom foot attachment.  I adore these zippers, super easy to install, super fast, and delightfully seamless.
  • About 2 yards of some fantastically unsightly fabric that noone in their right mind would purchase.  Ensure that it compensates for its ugliness by having a luscious hand.  You cannot skimp here.
  • 1.5 yards of 1.5" wide Grosgrain ribbon for a waistband.  Iron it in half, insert waist of garment, pin, and stitch twice close to edge opening.
Normally, I do a French seam on the inside (two straight stitches with my featherweight), but this time I cheated and just serged that puppy.  It came out beautifully if I don't say so myself.

I also normally do a very narrow hem, invisible stitched.  It takes a long time.  This print enabled me to do a simple rolled hem with my serger.  I'm normally not so lucky.  Being a perfectionist, I would ordinarily spend an hour and a half invisible stitching a stupid hem closed.  Yeah.  Neurotic behavior runs in my family.


As a closing remark, I must say that Sarah Marie makes a zipper, ribbon and yard and a half of semi-ugly fabric look good.  My disclaimer is that she chose that particular fabric, and that if I had selected it, it would have been significantly uglier.  It's not hard to sew for such a gorgeous model.

Monday, January 12, 2009

Onesie Success!

This project was the most fun I have had in a very long time.  Really.  Everyone had always told me how difficult it was to make baby clothes, but this was refreshingly easy and fun.

I got McCall's patter 8574 and recycled a t-shirt which I doubt ever would fit around "mommy" me again.  I used a serger on most seams and finished them with my Singer Featherweight, stretching serged seams slightly to give.  I used hemmed sleeve edges as the hemmed edge on the baby shirt sleeves (my overlock is only a 4-thread machine, and I'll cheat whenever possible).

The t-shirt was a woman's small.  The placement of the design on the shirt made it a little difficult to manipulate, and some letters were cut off, but it is still roughly legible.

I cut some corners with this one because it was a first try and I was using an old shirt that had been stained pink by a red sleeping bag at some point.  I was able to bleach it to get it looking pretty "new", and am pleased with the product.  I'll definitely be making more.

The only thing is, the onesie pattern is cut for a small line backer, and baby Soren is shaped like Michael Phelps.  Oh well, I guess he'll grow into it?

Front Detail


Front


Back, quotes Mark 12:30


Thursday, January 8, 2009

Soren's First Car Accident!

The whole ordeal started when I went to JoAnn Fabrics to exchange a pattern, got scammed by a clerk, who offered to give me $2 for a $12 pattern that another clerk promised full exchange value for.  When I was unable to produce a driver's license, I'm pretty sure she put a hex on me.

"What if you get pulled over?", she asked.

"I don't get pulled over.  I have an infant, I don't speed, and I'm a very safe driver," I replied.

"Well,  you never know," she countered.  "They perform random stops sometimes, and you could get arrested."

I shrugged it off, went to pick up my brother for a coffee date on his last day in town.  We grabbed coffee, went to the grocery store to pick up cheese for some Mac.  I was a half an hour late for our scheduled day feedings.  Soren is a sleepyhead and won't wake himself up to eat.  I have to wake him.  Almost every time.

We pulled out of the parking lot, into the Northbound lane at Vanderbilt and Airport, when I heard fire sirens behind me.  As a good, law abiding citizen, I pulled as far off the road as I could, into the shoulder.  Letting the emergency vehicles pass I merged back into traffic, and proceeded through the green light at the intersection.  Just then, a squad car with lights blazing, appeared on the right from Vanderbilt Beach.  Once again, as a good law abiding citizen, I quickly stopped to allow the car to proceed.

The van behind me didn't.

Soren let out a brief yelp, fussed for a second, and then there was the most petrifying silence.  I had visions of my fourteen day old infant bleeding to death in his lime green Chicco car seat.  I panicked.  My level headed brother declared boldly, "Sarah, you have to get out of the intersection."


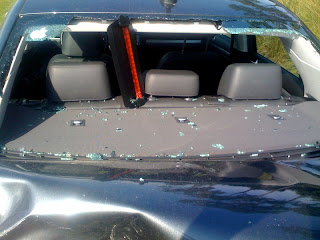
Pulling forward, I ran out of my car, crying and shaking, opened the car door, to find Soren sound asleep in his car seat.  My son had slept through a car accident.


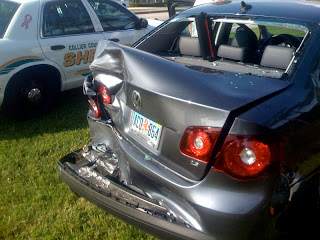
My trunk is about a foot smaller than it was before.  The car seat in the trunk is... nonfunctional?  


The poor guy who hit me was totally panicked.  His eight-month pregnant wife arrived on the scene.  I think he was having visions of his adorable Cuban wife and there two week old son on the side of the road.  They were as sweet as can be.

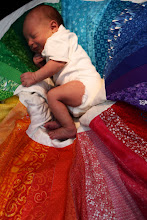
In the pic above, a half an hour after the accident, Soren is still sleeping soundly in his car seat on the side of Airport Road at 4:00 in the afternoon.

So here's what I'm grateful for:

1)  For some strange reason, I put Soren's docking station on the passenger side of the car.  Every time I put him in, I wondered to myself "Why did I do this?  It's such a pain.  I need to move it."   There was no glass on his car seat.  Glass was all over in the car, on the front dash, but none in his little seat.  The impact was much gentler on that side as well.

2)  I got to meat Joe and Lizette.  I hope our paths cross again.

3)  I got an extra half an hour with my brother.

4)  I quickly learned how very much I love my little boy.  I had no idea until I thought he might be hurt - or worse.  I really don't care about the car.  My baby is safe (and my brother - that was cool, too!).

5)  You can't put a price on a safe car seat.  Thanks to the engineers at Chicco for designing such an excellent infant car seat to keep my little boy safe.  

So Michael and I went to look at the car today.  The wreck yard owner said the whole back and will need to be completely rebuilt.  The insurance adjuster still hasn't looked at it, and I suspect he may declare it totalled.  We will see.

And it all started at JoAnn Fabrics, when that woman put a hex on me.